 page
pageWelcome to my page
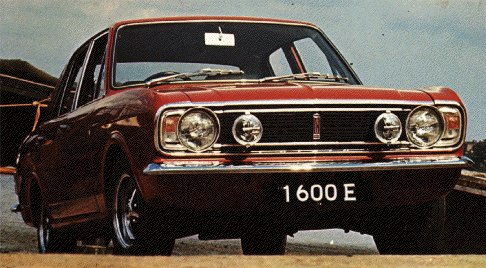
Well here are some pictures of my 1600E from September 2012 when i picked it upp after it had spent almost 30 years in a barn. Here i will put in som pictures as the renovation of the Cortina progresses
|
|
|
|
|
First from the front and then |
From the rear |
Picking up the car in december of 2012 |
|
|
|
|
|
Outside the garage under construction in the spring of 2013 |
And from the front with wrong grille, rust and no auxiliary lights Spring of 2013 |
Just a nice view |
|
|
|
|
|
Finally the E is in the workshop/garage 201309 |
So the fuel tank was leaking, well here is a new one grinded down to the metal and checked for wear/leakage 201403 |
Checked for leaks and primed 201403 |
|
|
|
|
|
Painted and antirust treated 201403 |
New exhuast system awaiting paint and mounting 201405 |
So the ball in the gear lever dissapeared 201409 |
|
|
|
|
|
In position to mount fuel tank, exhaust system and fix rear brakes 201412 |
Rear brake parts ready for use 201501 |
Brake Servo renovated and painted ready for the car 201501 |
|
|
|
|
|
Front brake parts renovated and ready to be mounted 201503 |
An old bad repair with just new steel over the rust revealed 201505 |
All rusted steel cut away and ready for welding in new steel 201505 |
|
|
|
|
|
New steel welded in, rust protected and zink primed 201505 |
A little more new steel before removing the strut to fix the rot there 201505 |
Over 30 spot velds removed and the reinforced plate kan be lifted to reveal the rusted steel below 201505 |
|
|
|
|
|
New steel welded in to replace the weakend steel arund the strut 201505 |
Doesn't look too bad 201505 |
But is tricky to access with my angle grinder and there is insulation under there that probably don't agree to well with welding 201505 |
|
|
|
|
|
The new steel plate has been welded in and is rust protected and zink painted 201505 |
Reinforcement plate repaired and bent back into position and spot welded 201505 |
All holes have been spot welded an linseed oil inserted between the steel plates for rust perotection. Zink paint added to protect the welds 201505 |
|
|
|
|
|
New steel for front wing support welded on beside the strut plates 201505 |
Finished welding the front strut and surroundings. Rustprotected and zinksprayed. 201507 |
Black protective paint added 201507 |
|
|
|
|
|
Rust taken away and getting ready for some new steel 201507 |
Welded in new steel and rust protected with zink paint. 201507 |
Lower rear part of inner wing with rust and a repairplate for the front of the sill 201508 |
|
|
|
|
|
Final repair on front inner wing now black protective added over the rust protecting paint 201509 |
Rear wheel arch fake repair some time to get all plaster out and replace with freash steel 201509 |
The rust have been taken away and only fresh steel present apart from a section cleaned and painte with "Biltema"s rust eater 201509 |
|
|
|
|
|
New steel spot welded 201509 |
Some more spot welds and it starts to look right 201509 |
Some more welding and paint and some filler later 201512 |
|
|
|
|
|
Oups another fake repair. Lots of plaster taken away 201601 |
Cut away all rust 201601 |
Testing the fit of the wheel arch from Motomobil. Looks nice 201601 |
|
|
|
|
|
So aonther matching of the wheel arch and making some measurements and welding the inner wheel arch in to place 201609 |
Inner wing welded in to place, now it is just to weld a lot moore! 201609 |
Some more welding, and my welds are starting to get better and better 201609 |
|
|
|
|
|
The front wing mounted with skrews instead of spot welds 201609 |
Inner wings mounted inside the wheel house to keep the rust out 201609 |
Wheel arch welded in to place with a few spot welds 201609 |
|
|
|
|
|
Plastered , grinded and plastered again 201609 |
Getting almost ready for some paint! 201609 |
The car has been turned around and inspection of wheel arches on the right side reveals some bad patching, so i have to replace them as well 201609 |
|
|
|
|
|
Really bad wheel arch, pieces are missing from it. So Good that i have a replacement wheel arch 201609 |
The rusty part of the wing has been cut off exposing the rusty inner wing 201609 |
Tool well rather rusty due to a wet cloth lying there for almost 30 years 201609 |
|
|
|
|
|
So the rust has been cut out and awaits new fresh metal. 201610 |
The rusty parts have been removed and a new inner wing edge is in place 201611 |
Front wing removed and revealing som nasty rust underneath, however not surprising 201611 |
|
|
|
|
|
The front of the sill is very rusty and so are the A-pillar door support. 201611 |
A bad repair job done on the same place on this side too! 201611 |
The rust in the supension tower seems to be worse than on the other side 201612 |
|
|
|
| 5
|
Not much left of the reinforcement bit for the front suspension. 201612 |
Covering metal removed, showing the condition of the front suspension mount 201612 |
The rust in the front suspension mount has been cut out and awaits new and fresh metal 201612 |
|
|
|
|
|
Other angle 201612 |
Rear right hand valance replaced and plastering begun 201701 |
Valance done and now the part behind the wheel arch where there has been a wet rag for some 30 years or so 201701 |
|
|
|
|
|
Finished welding and begun plastering 201701 |
Looking better and better 201701 |
Could not resist placing the wheel there just to see.... 201701 |
|
|
|
|
|
Starting on the suspension top again and replaced the upper part of the strut arms with 3mm steel 201702 |
Other angle 201702 |
Replaced all steel in the suspension top with 3mm thick steel, 1mm thicker than original 201702 |
|
|
|
|
|
Side "outside" reinforcement has after restoring been welded into place and rust protect laquered 201702 |
And painted black and got some underbody to protect against mechanical attacks 201702 |
So attention has gone to the bottom and the rusty parts has bee cut away. Which is the jack frame, some of the floor and the inner wing 201702 |
|
|
|
|
|
The cut away part at the bottom at the A-pillar, I will make a new steel part or parts that will be welded in instead of the rusty parts. The jacking part frame will be made in 3mm steel for robustness and because I have it 201702 |
So a new framepart built from 3mm thick steel. The tube for the jack has been transferd 201703 |
A-Pillar repaired, rust protected, painted and then underseal on top to protect from wear 201703 |
|
|
|
|
|
New homemade reinforcement welded in and rust protected with linseed oil and painted with rust protective paint. 201703 |
I had to build a new front wing support on the front panel due to that to original part had rusted away and this gives a better support for screwing the wings on instead of welding 201703 |
Badge 1969 |
|
|
|
|
|
The rusty parts above the lights has been cut away, showing how it looks underneath 201703 |
New steel welded in to support the inner wing mount. 201703 |
Upper steel welded in to match the front steel going across the front. Protected with protective paint 201703 |
|
|
|
|
|
Then light "cavern" grinded away all rust the rust protected and painted with zink protecitve paint 201703 |
And after that with a red primer 201703 |
And after that a coat of Amber Gold..... 201703 |
|
|
|
|
|
So inner wing ready for the front wing 201703 |
So inner wing mounted 201703 |
Front wing in place and looks rather nice 201703 |
|
|
|
|
|
Have been out for a spin. It runs hot and all over the road. So in again and fix stearing bushes and water pump 201706 |
While i'm at it i painted the exhuats 201706 |
So this is the culprit to why the car was hard to roll 201708 |
|
|
|
|
|
Finally ready for a test drive again 201708 |
Outside the garage , this time sadly 3rd gear is very noisy so it probably needs a gearbox renovation 201708 |
Lid and gearforks removed 201712 |
|
|
|
|
|
Gearbox interior 201712 |
Lots of stuff in a gearbox 201712 |
So the outer parts of the gearbox finished and rust protected 201712 |
|
|
|
|
|
So there are 20 needle bearings in the "bottenstock" (sorry dont know what is's called in english) and not 21 as the repair handbook says 201804 |
So finally succeded in mounting the gearbox interoir with new bearings, Thank you Bertil for all the help 201804 |
Gearbox with gears and outgoing shaft removed, showing the bottom shaft let down and the reverse gear and ingoing shaft 201804 |
|
|
|
|
|
So outgoing shaft with gears and outgoing bearing mounted in the strut, awaiting mounting in gearbox house 201804 |
Strut mounted in gearbox house, starting to look tidy 201804 |
Gearbox completely mounted and ready to be mounted in the car. The test drive revealed no bad sounds what so ever so renovation succesful :-) 201804 |
|
|
|
|
|
Rims under renovation. Grinded and varnished. Chrome polish left 201804 |
The seat's clothes are not that bad under the hairy covers 201805 |
So here we are finally, all ready for the Swedish MOT or the Swedish Motor vehicle inspection 201805 |
|
|
|
|
|
Rims finished. Paint drying over night 201805 |
Before and after 201806 |
Anti-rollbar rustprotected with Biltemas rusteater 201806 |
|
|
|
|
|
Pressed Track Control arms, rusty and ugly waiting to be scrapped as soon as my new TCA's arrive from Australia 201806 |
Old pressed and rusty TCA's along the new casted ones from australia 201806 |
The new cast TCA painted with the new bushes exept the new outer TCA's poly bushes 201806 |
|
|
|
|
|
So all parts of the steering renovated, rust protected and paints, ready to be mounted 201807 |
So the look very different but the distances are correct, though for while that the new ones where shorter but i t seams they are not 201809 |
Finally passed MOT (bilprovningen) so no new more of that until 2099 but maybe some visits anyway to check everything sometime in the future 201810 |
|
|
|
|
|
Engine is still going hot and not so strange with all this stuff in it restricting waterflow 201810 |
So a real flush of the engine to get all the rust out, so now it runs with normal temp 201810 |
So when the float is leaking and gets filled with fuel, the fuel gauge shows empty tank all the time 201810 |
|
|
|
|
|
I got hold of 5 fine rims and the mounting parts inside the grill for the auxiliary lights 201812 |
Beginning the new year with 6 restored and painted E rims. 5 for the E and one for the Capri 201901 |
Auxiliary lights mounted together with some modern lights under the bumper 201901 |
|
|
|
|
|
So the overriders are a bit rusty, time to send to the chromer perhaps 201901 |
Seems like the car has been lowered som time in the past 201901 |
A little more shine, a new bumper and chrome sorounding för the registration plate 201901 |
|
|
|
|
|
I decided to move the battery to the luggage so here it is in a box with the 150A fuse 201902 |
Tested fitting the box in the tool well and it fits just fine, mounted into the floor with two M10 bolts. The white cable is for the clock 201902 |
So at last mounted and working 201902 |
|
|
|
|
|
So finally new tires for the 1600E as well, spare weel also new 201903 |
The heater valve is somewhat compromised after 50 years. But i new one is ordered from Tradera 201904 |
A new mat for the boot from Biltema fits rather well 201904 |
|
|
|
|
|
New rear view mirrors have juat arrrived from ebay. Will hopefully fit them one day also 201906 |
So no engine in. Low compression on first cylinder and the engine comes out for new rings 201906 |
Engine ready to be refitted with new rings so hopefully better compression 201906 |
|
|
|
|
|
And so the engine is in place 201906 |
- 2019XX |
- 2019XX |


